I made a photo-report on occasion of installing the bulbs in the toyota camry V50 interior light bulbs.
The set consists of 8 boards which are designed to replace the original bulbs in all the interior lamps. There are a total of 8 lamps in the interior of the V50.

Bright white LED light kit.
Let's start with the light bulbs located in the doors.
Using slim, flat, metal tool pry the light at the edge (close to the front of the car) and remove the light from its seat.
Then using the same tool we press the lock and disconnect the wiring plug from the spotlight.
The next step is to disconnect the plastic heat shield from the plafond body.
Now you can remove (by squeezing) the bulb.
Now we proceed to installing the LED boards. This is what the kit boards look like for installation in the door plafonds:
With a pushing motion, drive the board into the socket of the plafond.
That's it. Now you can connect the plug and install the spotlight in its place.
Since, unlike regular incandescent lamps LEDs do not emit as much heat, heat shield cap is no longer used.
Front ceiling light.
Use the same flat tool to pry the glass and remove it from the clips.
Remove the bulb.
Take the two boards, designed to be installed in this headlight.
Attention! When installing the boards, pay attention to the fact that the notch on the board is located on the side where the bulge in the lamp housing is located.
Insert the boards by pushing them in as far as they will go. Turn on, check.
Mirror illumination lights in the sun visors.
Press out the mounting clip and remove the lamp housing from the ceiling.
Disconnect the bulb holder from the lamp housing.
Remove the regular bulb.
Insert the LED board.
This is how the circuit boards, designed for installation in plafonds of mirror lights.
And in reverse order of collecting plafond and install it in its place.
And finally, the rear ceiling light.
We lift up and remove the glass diffusers of the spotlight.
Remove regular bulbs.
And in their place set the LED bulb board.
This is how the LED bulbs, designed for installation in the rear ceiling light.
Checking operability and installing glass diffusers.
That's all. Looking at the result of done work. ))
I remind you that the cost of a set of bright white plafond, led lighting for camry V50, is 20 usd. Cost of installation at club car centre .
Read also: Repair and replacement of the bumper on a Toyota Camry VI (XV40)
You can buy these lights (with the ability to send to any region of EU) in the club shop. Details. Well, to install (as seen in the above report) in principle, not difficult to do yourself.
Conventionally, the bulbs can be divided into bulbs that are inside and outside the car. The former provide illumination for the driver and passengers. Some of the interior lamps serve to signal various actions by the driver. The bulbs outside the passenger compartment provide illumination of the road at night and also inform other road users of the driver's actions.
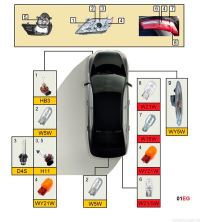
The purpose and type of bulbs used, shown in the illustration above, is shown in the table below.
Table - List of main lamps
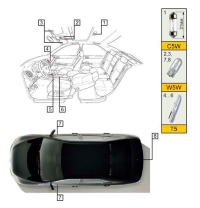
Position of bulbs in the passenger compartment
A list of bulbs used in the interior of the Toyota Camry 40 is shown in the table below.
No. Type of bulb Purpose
1 C5W Centre light. Used for illuminating the interior of the vehicle.
2 W5W Front light. Illuminates the front passenger and driver's seats.
3 W5W Individual lighting
4 T5 Glovebox lighting
5 T5 Cigarette lighter
6 T5 Light for automatic gear selector
7 W5W Door opening lighting
8 W5W Trunk lighting
Lamps used in Toyota Camry xv40
Owners of Camry xv40 often complain of poor passing beam. This problem can be solved by adjusting the headlights or replacing the bulbs. How to adjust optics and fog lights of Camry 40 we told in this material.
The manual for the 2006 - 2011 Toyota Camry has a table with information about the electric bulbs.
Detailed information about the bulbs used in the optics and lights of the Toyota Camry XV40:
high beam - HB3,
parking light and number plate illumination - W5W,
low beam - halogen H11, discharge D4S (xenon),
front and rear position indicator lights - WY21W
fog light - H11,
rear brake light and parking lights - W21/5W,
reversing light - W16W,
rear fog light - W21W,
sidelight (on body) - WY5W.
The letter "Y" in the bulb designation indicates that the colour of the bulb is yellow. The bulbs in the side indicators are not replaced by the manufacturer, the lamp is replaced as a complete unit.
Bulbs used in interior lighting of 2009 Camry:
general lighting, centre light - C5W,
driver and front passenger light - W5W,
sun visor light - W5W,
glove compartment light - T5,
cigarette lighter light - T5 (with green filter),
automatic gear selector light - T5 (with light filter),
front door opening light - W5W,
boot luggage compartment lights - W5W.
How to change front bulbs on a Toyota Camry
No tools are needed to change the low and high beam bulbs. But to access the front clearance and indicator bulbs, a small flat screwdriver will come in handy.
Changing turn signal and clearance bulbs is much easier from the wheel arch. To do this, turn the steering wheel (and the wheel accordingly): to the left if the replacement is from the passenger's side, and to the right if the bulbs are replaced from the driver's side.
Then remove at least two of the wheel arch protectors and unscrew the protectors, gaining access to the bulbs.

-rear-and-front-view-camera-6.png)