
At the time the Toyota Camry V40 was launched, the standard head unit had an ample range of options. Since the end of production of the forty, the development of automotive and not only electronics has progressed tremendously. Today, the set of features that gives factory head unit, completely insufficient, so many owners of Camry 40 think about replacing the head unit. In this article you'll learn how to remove "OEM" boombox, how to choose and install new one, how to connect rear view camera, we'll also tell you about USB adapters.

Camry 40 head unit
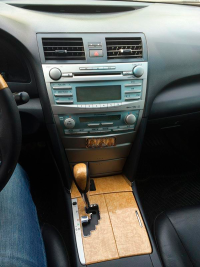
Camry 40 Camry head unit
Genuine Camry VCR
Head unit, which was put on the initial kamri 40, can not satisfy the needs of modern man, it does not give him the usual features that have become part of the pastime. Rich kitting after restyling in 2009. Prestige, Luxe were equipped with boombox with navigation and rear view camera, but this variant of receiver considerably yields by its functionality to boomboxes available today.
"Camry V40 original boombox often fails to read discs due to a disc stuck in CD changer. To repair your Camry V40 head unit, you'll need to remove and disassemble it.
There are several ways to extend functionality of a head unit: connection of usb adapter and replacement of a radio-recorder. Both options involve removing your Camry V40's "native" head unit, so we'll explain how to do it in detail.
Read also: Complete info on decoding toyota corolla vin number without using pay services
To remove a car radio
Removing the panels from your Camry 40 head unit
To remove your Camry 40 head unit you'll need a Phillips screwdriver and a 10mm socket spanner. Be sure to disconnect the battery before removing the head unit. Start by unscrewing the automatic transmission knob, unscrewing it anticlockwise. Then the plastic side covers are removed, just pull them towards yourself, they are fastened with clips.
In the same way the panel where seat heating and cigarette lighter are detached, their connectors are disconnected after unscrewing clips. Before dismantling this console, open the armrest so that it does not get in the way.
Removed automatic transmission knob console Camry 40
Next, the two self-tapping screws that hold the ashtray are unscrewed, after which it is easily removed. Then the air ducts over a radio are removed, pull them towards yourselves and disconnect a wrecker plug. Remains to remove the radio, which is removed along with the climate unit by unscrewing 4 bolts at 10 (two at the top and 2 at the bottom). It is more convenient to disconnect the climate plug when it is not yet unscrewed. Disconnect all connectors from the radio and the disassembly is complete.
To separate the climate unit and radio, connected together by a metal frame, you need to unscrew 6 bolts (3 on each side). This can be done with a screwdriver or an 8 mm spanner.
Assembly is performed in reverse order.
Repair of car radio
These self-tapping screws of a car radio should be unscrewed
If Camry V40 head unit does not accept discs, using "Load" and "Eject" buttons doesn't bring the desirable result, discs are most likely stuck in CD changer. There is no need to hurry and go to an electrician, you can cope with such a fault yourself. First remove the CD changer and disconnect it from the climate unit as described above.
Then in the upper part unscrew 1 screw on each side, the upper metal cover will be removed by lifting it with a screwdriver.
Camry 40 CD Changer Plates
Discs are removed very carefully so as not to break the plates on which the discs lie. Once removed, the plates must be inserted into the slots. Take your time to reassemble the CD changer, before fitting it, be sure to test it by connecting it to the car, inserting and removing all six discs.
Congratulations, you have repaired your car without spending a single dollar!
Features of USB adapters for
It is not convenient to permanently record music, audio books for listening in the car on disks. It is easier to use flash drive and telephone, but "native" multimedia system of Camry V40 doesn't have such functions, so automobile owners install USB adapters.
USB adapter (don't take it as an advertisement)
Advantages of installing an MP3 adapter in your Toyota Camry V40:
the installation work can be done by yourself
the cost of the device is not high
Steering wheel music control is retained
CD changer continues to operate normally.
To install the USB adapter, it is necessary to disassemble the head unit, this process is described above. Next, you will un-pin the MP3 adapter, the cord will be inserted into the CD changer connector at the back, be careful with the 12-pin connector (6+6). The adapter can be hidden behind the stock head unit.

Read also: Variety of toyota camry 40 diagnostics: instructions
USB adaptor connection socket in the Camry 40
12 pin connector for USB adapter
USB and AUX cords are best routed to the furthest opening in the glovebox because the glovebox rails move closer. To use a USB stick in the car, it must be formatted to FAT32, folders CD1, CD2, etc. must be created and music in MP3, WMA, AAC format written into them. (The number of CD... folders to be played depends only on the head unit, how many discs it is designed for). Switching between OEM head unit and adaptor is done by pressing the "DISC" button. Folder switching on the USB stick is similar to switching of discs in a CD changer.
The advantages of using an MP3 USB adapter are as follows:
The ability to play a large number of songs,
Up to 100 tracks can be stored in each folder,
The last track played is stored,
When starting a song, the song plays from the point at which it was paused,
AUX allows you to play audio files from any device with a headphone jack.
Write a review
Your name:
Your review:
Note: HTML markup is not supported! Use plain text.
Rating:
Poor Good
Enter the code shown in the image:
Delivery within the city is FREE OF CHARGE, except for Zavodskoy and Likhovskoy settlements and other remote locations relating to Kamensk-Shakhtinsky.
Delivery outside the city is made on condition of 100% payment in advance for the goods by bank transfer on the basis of the invoice for payment or bank transfer to the card shop.
How to choose the right Android head unit for your Toyota Camry 40
Tesla-style Camry 40
New Tesla-style Camry 40
Replacing your Camry's original head unit is the desire of motorists who lack the functionality of a "native" head unit. Installing a USB MP3 adapter offers a few handy features, but doesn't solve the problem completely. Therefore, the only option is to install another entertainment system.
Before you purchase a new car stereo for your Toyota Camry, you need to understand what features you require. If you only need audio playback from a flash drive or a phone, then installing a USB adapter is sufficient, but if you want to watch videos, surf the Internet or need navigation, then replacing the head unit is the only option.
One of the main characteristics of a car radio is its processor performance, don't rush to buy a head unit based on the principle: "The more cores the cooler!" This is not always the case. Second most important aspect is RAM capacity, 2-4Gb will be quite enough for car radio. Screen size and resolution are the next criteria.
Car radio for Camry 40 with not big display
Camry 40 with smaller display
Read also: Instructions for changing the timing belt on a toyota corona or carina
There are Tesla-style entertainment systems for the Camry with a 12.1-inch monitor diagonal, which look spectacular and provide the owner with a huge list of features. But Tesla-style Camry 40 will look out of place and won't come cheap either. The antipode of such a GUI is an entertainment system with a small 7-inch display, which looks almost identical to the "native" radio.
The advantages of head units for Toyota Camry with Android operating system are:
high performance, i.e. quick start and immediate response to commands,
playback of all possible audio formats,
good screen resolution,
Bluetooth, USB and AUX,
ability to connect to wireless internet (3/4G),
good sound quality of played audio files,
Installation of the applications available for the Android OS,
synchronisation with your phone, if it is also Android.
You may not need a pinout for your Toyota Camry V40, if you buy a good entertainment system, it will have plugs identical to the stock head unit.
OPTION #1 "Hi-Fi"
Speakers are fitted as standard, with 8-channel amplification. Channel-by-channel amplification of front and rear speakers. Full functionality of in-house boombox is preserved. Suitable for those who don't want to occupy space in the boot with a subwoofer, but understand that without a subwoofer in the car, there will be no bass. Premium front speakers are used. Rear speakers with good bass response are used, which will provide ample bass depth. Using a 10-channel processor enables the correct 'slicing' of the signal delivered to the loudspeaker, to 'squeeze' as much as possible out of it.
Tweeters (tweeter) - the speakers are designed to reproduce the high-frequency portion. MidRange (midrange) speakers are designed to reproduce the midrange. These speakers are most relevant for reproducing sounds, as most of the waves are in the midrange. MidBass (bass) speakers are designed to reproduce midrange bass.
Connecting the rear camera to the head unit
When selecting a rear view camera for your Toyota Camry 40, preference should be given to a unit to be fitted with an accompanying number plate light.
Rear view camera mounted in number plate light
Rear-view camera integrated into number plate light
This device saves you several hassles:
You won't have to make a hole in the boot lid which could become a hotbed of corrosion,
the camera wiring would be reliably protected from moisture.
To begin with, the boot lid trim must be disassembled by removing the clips. Then the plastic tab ("sabre") with the Toyota badge on it is unscrewed. The number plate bulb is removed and the camera is fitted.
The wiring harness is connected as follows:
the yellow tulip wires are connected to the camera on one side and the Camry 40 on the other,
the red one on one side is connected to the wire where the + appears when the gear selector is in R position. Near the radio, this wire connects to the RCA activation lead on the radio's wiring harness,
the red tulip wire must be connected to the permanent + and the black wire to the ground -.

-rear-and-front-view-camera-6.png)