
Replacing the lens on a 2011 Camry
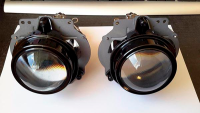
To replace a faded lens in the Camry 40 you need to disassemble the headlamp. The optic can be opened by heating the joint of the body and lens with a construction hairdryer, be careful not to melt any element. The second way is to unscrew all the screws, remove dust caps and plugs, metal parts from the headlight and place it wrapped in a towel into an oven heated to 100 degrees.
Once the optic is warmed up, begin to carefully detach the housing from the lens using a flathead screwdriver. Take your time to open the headlamp gradually. Warm the optic again if necessary.
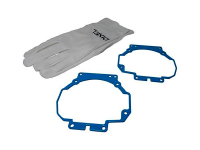
The sealant will be stretched by the fibres which must not come into contact with the inside of the optic. After opening the headlamp while it is hot, glue all threads of sealant onto the headlamp housing or lens.
The lens is attached to the body with three clips, unclip one of them and gently press out the lens. Purchase lenses with adapter frames, which will make the job much easier. Replace the lens with a new one, wipe with 70% alcohol solution. You may remove dust and debris from the inside of the headlamp with a dry, lint-free cloth.
Do not use acetone! It may damage the surface of the parts.
Do not change bottom edge (cut line) of shield slit, you will dazzle oncoming motorists.
With the lens in place, preheat the oven and place the headlamp, wrapped in a towel, for 10 minutes. Remove and press the glass to the frame, do not overdo it, it may break, it is better to repeat the procedure 3 times. Glass in place, screw in screws and place in oven for another 5 minutes.
Button illumination
In order to install illuminated buttons on the steering wheel of the Toyota Camry 40, you must follow the instructions below.
Disconnect the battery.
Wait 10 minutes and remove the airbag located in the steering wheel.
Remove the two screws shown in the illustration below. This will enable removal of the button unit.
Process for installing the steering column-mounted light unit
Remove the button unit.
Disassembled button unit
Dismantle the button unit and remove the boards.
The board
Disassemble old LED's.
Fit new LEDs.
View of the buttons at night.
Door sill illumination
The simplest type of car lighting is prefabricated lighting solutions, which are available from your usual car dealer.
The installation process consists of gluing special covers with double-sided adhesive tape. The wires need to be connected to the door opening button.
Camry 40 lighting
Installing the sill lighting
Camry 40 lighting
Threshold lighting
Tuning the lighting in the Camry V40
This topic is intended to summarize the answers to frequently asked questions about tuning interior lighting. Despite the fact that this time we will talk about Camry V40, the general principles and techniques can be applied to other models.
Have been removed door handles (the sequence of operations for removal will lay out later), at the top of the bowls are prepared holes in which the smallest LEDs, embedded in series through the resistors 1 kOhm to limit brightness:
Replacing the high beam bulb of the Camry V40
The high beam bulb is located in the inner corner of the headlight assembly. It is replaced in the same way as the dipped beam bulb. It is necessary to turn the bulb base a quarter anticlockwise, remove the bulb and disconnect the connector. Insert in reverse order.
Replacing the clearance lamp of the Camry V40
The clearance bulb is located just above the light grey indicator bulb socket, and has a black base. Turn the bulb 1/4 turn anticlockwise, remove the bulb and remove it from the socket. Then insert the new bulb into the socket, fit into the headlamp and rotate 1/4 turn clockwise while locking.
-2006-2011-(restyling-2009-2011)_.png)